Arrow

Posts on this site are never sponsored.

WordPress MU plugin contest — vote now!

October 13, 2008 update: thanks to everybody for voting and thanks to WPMU.org for organizing this contest! The winners have been announced.

WPMU.org is holding a WordPress MU plugin contest, closing on October 10. For those who are familiar with WordPress but not WordPress MU, “MU” stands for “multi-user” but a more appropriate name would be “multi-instance” — it enables you to run multiple WordPress blogs on the same WordPress installation. This makes maintenance, administration, and integration between blogs a lot better and easier than installing WordPress multiple times.

Anyway, I have an entry in the contest, which is my collaboration e-mails plugin for WordPress MU. In a nutshell, when someone submits a post to be reviewed, the plugin e-mails a list of editors that you can define, based on the post category or the author. It should be quite useful if you have a blog where you want posts to be reviewed before they are published.

I would certainly appreciate your votes — please vote here! (The “Collaboration E-mails” plugin is the 6th from the bottom.)

Vote here!

Thanks!

——————————————–

If you are interested, here is a list of some other plugins I have developed for WordPress:

  • Login Redirect: Redirect different users to different pages when they log in.
  • After-Comment Redirect: Specify a page that should be loaded after people submit comments.
  • Shorten URLs in Posts: If you or someone else on your blog is prone to posting long URLs that run off the page, this plugin automatically shortens those URLs.
  • Disable HTML in Comments: If your commenters often write code snippets in your comments, make sure that they are displayed literally instead of being interpreted as HTML.
  • Date Countdown: Display a list of important events and how much time remains until each event.
  • Custom Anti-Spam Image: This generates a word image that people have to enter before they can comment, thus stopping a lot of automatically-generated comment spam. I’ve also created random and math versions.
  • Blog URL Shortcodes: Use code like [blogurl] and [post id=3] to generate internal URLs in your posts, so that you won’t have to worry about changing domains or URL structures in the future.
  • File Change Notifications: This doesn’t plug directly into the WordPress plugin system, but is useful for security purposes if you want to be e-mailed whenever a file in your blog directory is modified or added.
  • Post Notes: Add notes on the “edit post” screen’s sidebar in WordPress 2.7 and up. Works well with the collaboration e-mails plugin so that administrators and contributors can share comments about pending posts.
  • Case Insensitive Usernames: Allow users to log in with case insensitive usernames. For example, if their username is “Peter”, they can log in with “peter” or “pEtEr”.

You can also find other WordPress and code tips that I have written here.

iTunes Canada online movie rentals review

Lost amidst the arguably over-hyped Apple product releases this year was the launch of video rentals and sales through the iTunes Canada Store in summer 2008. I recently discovered this, and will share some thoughts and experiences with the rental service (the buying part doesn’t really interest me).

Why online movie rentals?

I’ve always wanted some sort of movie download rental service. Traditional retail stores (like Rogers Video), movies-by-mail services (like Zip.ca), and self-service kiosks (like Quickflick) all have their uses. However, downloading offers the following benefits:

  • No transportation costs
  • Freedom from having to physically return the movie
  • The online store cannot “run out” of movies if many people rent them
  • Freedom from physical media waste (i.e. no non-recyclable DVDs)

Although you can of course download movies for free using peer-to-peer clients such as µTorrent, that was a bit too guilt-inducing for me. Also, the speed for such methods often leaves something to be desired.

For a short while now, there has been enough infrastructure and bandwidth, as well as the proper digital formats and media convergence, to make a legitimate operation happen. I never thought I’d consider Apple as the pioneer for this in Canada, but I must say, they’ve done a pretty good job.

How to rent from iTunes

First of all, you need to install iTunes, which is available for Windows or Mac. Note that you don’t actually need an Apple device like an iPod or iPhone to explore iTunes.

Once you are in the iTunes program, you can click on the link to the iTunes Store, where you can search for and browse movies. You will have to register for an account and provide your credit card information — this takes about two minutes.

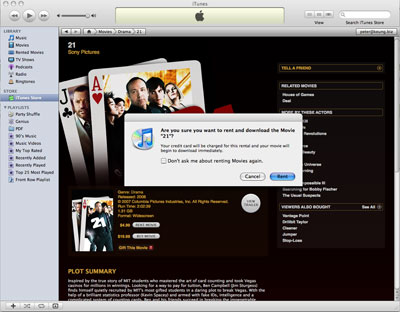
On the description page for a movie, you will find buttons for renting (if available) and buying the movie.

Information page for an iTunes movie

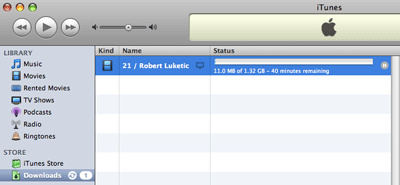
Once you confirm the rental, your credit card is charged and the download process starts immediately. I was impressed by the speed of the download, as the 1.32gb file downloaded in less than 40 minutes on my cable Internet connection.

Fast download process for an iTunes movie

Given that the movie I chose was about 2 hours long and the download process was going to take less than half of that time, I was able to start watching the movie immediately. This meant that the overall process from signing up to watching the movie took about 5 minutes (not counting the time it took to choose a movie). Subsequent rental acquisition times would presumably be less than a minute from when I choose the movie.

The movie was then available in my list of rented movies. From the time you first play the movie, you have 48 hours to watch it as many times as you want. Once the rental period is over, the movie is automatically removed from your system. Also, if you don’t want to watch the movie immediately, you supposedly have 30 days to begin watching the movie.

List of rented movies in iTunes

Although Apple tied the iTunes movie store release to its Apple TV product, you do not need that device to play the movies. Quality-wise, the movie played great on a 20-inch iMac.

Full-screen, high quality iTunes movie

(It’s true, the small screenshot doesn’t show much, but trust me, the movie looked good in full-screen view!)

You can watch the movie on your computer screen, or you can hook your computer up to a TV (via S-Video out, DVI out or whatever you have), or you can watch it on a small, portable media product made by Apple (iPod, iPhone, etc.). The latter option brings up the vendor lock-in issue, but is only an issue if you want to take your movies with you.

Selection and pricing

From what I can see, most movies cost either $4.99 or $3.99, tax (surprisingly) included, to rent (the movie 21 that I rented was $4.99). Most movies were $19.99 to buy. The rental fee is comparable to a retail store. I would have thought it would be slightly cheaper, but it’s not a deal breaker for me.

Comparing the movie releases on iTunes to Rogers Video’s new releases, most, if not all of the popular releases are available on iTunes. However, while these movies are available immediately to buy, most of them cannot be rented until 3 to 4 weeks afterwards! Although I don’t wait eagerly for every new release, this might be an annoyance for those who do.

As for older movies, iTunes has a decent selection but it currently doesn’t even come close to a traditional video store in terms of titles available. But, of course, there’s little commitment in browsing the iTunes Store online before heading out :D

—————————————

Renting movies through the iTunes Canada Store is quite a smooth process. I am impressed by its polish and surprised that it was launched relatively quietly. If the pricing and playing options work for you, it is definitely worth a try!

E-mail management with Google Apps for shared hosting

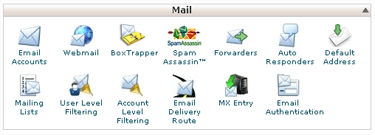
If you have your own domain name, and purchase a shared hosting account for it, you can often create and host e-mail addresses for that domain with the web host. For example, the control panel on your web host (for me this is cPanel) might enable you to: create many [email protected]; check the mail directly on the server; check the mail remotely from a different web client or a desktop program; handle forwarding to other addresses; manage spam blocking; and more.

cPanel e-mail options

Why e-mail hosting with you shared hosting provider is sub-optimal

Hosting your e-mail on the same server as your website is often convenient. However, in the typical shared hosting environment, your messages might not always be sent and received in a timely and reliable manner. As good as my shared web host has been for serving web pages, I’d rather not use it for e-mail. Here are a few reasons why:

  • Clogged e-mail queues: With potentially hundreds of other people using the same machine as you, you have no idea as to whether one or all of those people (including regular new customers) is going to be a heavy e-mail user, or worse, a spammer. Therefore, with server resources trying to serve pages and unpredictable volumes of mail, it is more likely to get bogged down in a shared environment. I have experienced this many times, where people took hours to receive my mail or I was receiving their mail days after they’d sent it. Often this was due to only one other heavy user on the machine: they were spamming or had a script hacked, thus resulting in backed up e-mail processing queues.
  • Blocked IP address: If you have a spammer on your machine, they don’t even need to be a heavy user to cause damage. If someone complains that spam is being sent from your server, external e-mail providers are often quick to temporarily block any mail coming from that server’s IP. This affects you even if your domain was not the problem. In that case, outgoing mail is definitely hindered but you might also have trouble receiving mail if you forward it somewhere else.
  • Limited storage space: When you purchase shared hosting, you are often thinking about the space you need for your website. A typical blog with only text and pictures takes years to even use up 100mb of space. If you choose to leave e-mail on your server, you can quickly outgrow your hosting account based on e-mail alone.

Reasons to handle e-mail with Google Apps

Google Apps is a free service that can handle many aspects — most importantly for me is e-mail — associated with your domain. It is not a particularly new service, but I recently made the decision to switch my e-mail handling over to Google; it was painless and definitely worth it. Basically, you get the same e-mail access as with a normal Gmail account, but for addresses for your domain name (in other words, [email protected] are handled by Google). Your web host can then continue to serve web pages as usual.

There are many reasons for letting Google handle your e-mail:

  • Spread your risk: If your website is having troubles, your e-mail service can often (but not always, depending on your setup) continue to function normally with the external provider.
  • Use Google’s infrastructure: Why bog down your server when you can let Google do all the heavy e-mail lifting? Say goodbye to clogged e-mail queues.
  • Storage space: With Google currently offering more than 7 gigabytes for each e-mail account, this is twice the amount of space per e-mail account (and by default Google Apps gives you 100 accounts) than what I use for all of my websites combined.
  • Gmail features, but no Gmail interface lock-in: Gmail has some really great features such as powerful filtering rules and a good anti-spam blocker. Plus, if you’re like me and don’t actually like the Gmail user interface, you can let Gmail handle the initial mail processing but then forward your mail elsewhere (in my case, that’s to Yahoo! Mail). You can also configure external web and desktop clients to access your e-mail via the standard POP and IMAP protocols.
  • Free yourself from other spammers on your web server: If Gmail users are using their accounts to spam, Google will theoretically deal with those users without affecting your service.

Setting up Google Apps for your domain

I’m not going to go through each step for managing your domain’s e-mail through Google Apps, because it’s actually quite straightforward after you sign up.

In order to have your domain name automatically point to Google as the handler of all things e-mail, you need to change the MX records through either your web host, your domain registrar, or your external DNS provider. There are some great Google instructions on this and there’s a good chance that they have instructions for your particular setup.

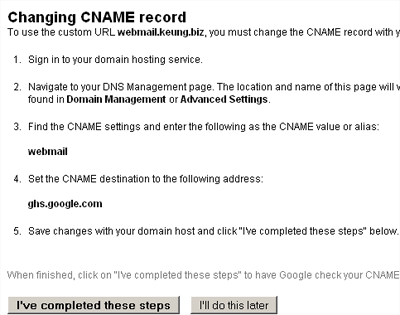
By default, your e-mail interface is then accessible via http://mail.google.com/a/yourdomain.com. However, with a bit of work you can also redirect something like http://webmail.yourdomain.com there.

Instructions on adding a CNAME record

As I mentioned earlier, Google Apps usually lets you have 100 user accounts under one domain for free. Under the free service, you can also: add e-mail aliases (like having [email protected] forward to the desired [email protected] address); have synced domains (like having all configured users @yourdomain.com also work in a mirrored way for @yourdomain.ca); set up e-mail lists; take advantage of the other Google Apps for your domain such as Google Docs and Google Calendar; and more.

The Premium package costs $50 per user and gets you extra business features such as support, more storage, SSL enforcement, a single sign-on API, and no ads.

Redirect WordPress users to different locations after they log in

With the release of WordPress 2.6.2 came a new filter for the “redirect to” address. For the non-technical folk, this means that you can specify different landing pages for different users after they log in. For example, you might have built a custom page for editors with custom news, edit links, and other special information. You can thus redirect them to that URL instead of the default WordPress dashboard.

I started to work on using such a feature previously but WordPress 2.6.2 makes the functionality a lot cleaner. Therefore, I’ve built a plugin that lets you redirect users based on their usernames, roles, and levels and capabilities (in that order).

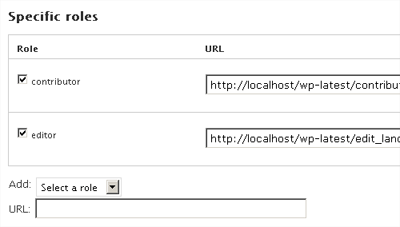
Once you’ve uploaded and enabled the plugin, you use a management page under Settings > Login/logout redirects to manage the redirect rules:

Peter's Login Redirect

In addition to the user-, role-, and level-based rules, you can also define a “catch-all” redirect URL for all other users for which the rules don’t match. You can also define a post-registration redirect URL. Note that WordPress does not allow you to redirect to external sites by default. (In other words, if your site is yoursite.com, you can redirect to yoursite.com/custom_page.php but not to theblog.ca.) Starting in version 1.7.0 of the plugin, there is a setting $rul_local_only in the plugin file itself that will disable this limitation (and does so by default). To add domains to the “allowed redirect” list in WordPress, use a plugin similar to this.

There is also a feature to configure a custom logout URL.

  • Need functionality to redirect users on first login? See the documentation in “How to Extend” in the readme.txt file, or use the standalone functionality.
  • Need functionality to redirect users based on an IP address, or based on custom login? See the documentation in “How to Extend” in the readme.txt file for examples on how to extend the plugin.
  • Need functionality to redirect users back to the same page where they logged in from? See this comment for ideas.

Download Peter’s Login Redirect Version 2.9.2 (Make sure you have WordPress 3.2.0 or higher!)

  • nl_NL translation by Anja
  • sk_SK translation by Michal Miksik
  • ro_RO translation by Anunturi Jibo of http://www.jibo.ro
  • cs_CZ translation by Petr MaĊĦek and Michal Kuk
  • de_DE translation by Lara and Mario
  • es_ES translation by Closemarketing
  • lt_LT translation by Vincent G
  • da_DK translation by Tom
  • id_ID translation by Syamsul Alam
  • uk translation by Yura
  • sr_RS translation by Borisa Djuraskovic
  • fr_FR translation by DomBonj
  • pt_BR translation by Graal4
  • ru_RU translation by Sergey

Troubleshooting
Login redirects not working? This plugin uses WordPress’s standard login_redirect hook. The usual cause of problems is that another plugin is using the hook first, or there is a custom login form that isn’t even running through the standard WordPress login functions.

These threads might be useful:

Also see the instructions at the bottom of the settings on the “Settings > Login/logout redirects” page in the WordPress admin panel that says:

“Use external redirect file. Set this to “Yes” if you are using a plugin such as Gigya that bypasses the regular WordPress redirect process (and allows only one fixed redirect URL). Then, set the redirect URL in the other plugin to
http://www.yoursite.com/wp-content/plugins/peters-login-redirect/wplogin_redirect_control.php”

Version history
2.9.2: Add CSRF protection (thanks RIPS!). Fixed translations for “username” variable instruction (thanks Jaime!).
2.9.1: Support utf8mb4 encoding and prevent cross-site scripting when editing redirect URLs.
2.9.0: Update translation text domain in order to support translate.wordpress.org translation system.
2.8.3: Add new URL variable “userslug” to match author URLs.
2.8.2: Translation string fix.
2.8.1: Support the deletion of rules referencing deleted user, roles, or levels.
2.8.0: Improved management interface to add specific Edit and Delete buttons per rule, and removed limit around number of rules.
2.7.2: Support PHP 5 static function calls, bumping WordPress requirement to 3.2+.
2.7.1: Bug fix: Role-based login URLs weren’t saving correctly.
2.7.0: Add logout redirect URL control per-user, per-role, and per-level.
2.6.1: Allow editors to manage redirects in WordPress 3.5+ (required capability is now “manage_categories” instead of “manage_links”).
2.6.0: Added support for URL variable “http_referer” (note the single “r”) to redirect the user back to the page that hosted the login form, as long as the login page isn’t the standard wp-login.php. There are several caveats to this, such as: If you want to redirect only on certain forms and/or specify a redirect on the standard wp-login.php page, you should modify the form itself to use a “redirect_to” form variable instead.
2.5.3: Bug fix: Fallback redirect rule wouldn’t update properly if logout URL was blank on MySQL installs with strict mode enabled (thanks kvandekrol!)
2.5.2: Bug fix: Fallback redirect rule updates were broken for non-English installs.
2.5.1: Bug fix: Redirect after registration back-end code was missed in 2.5.0, and thus that feature wasn’t actually working.
2.5.0: Added redirect after registration option. Also made plugin settings editable in the WordPress admin panel.
2.4.0: Added support for URL variable “postid-23″. Also added documentation on how to set up redirect on first login.
2.3.0: Added support for URL variable “siteurl” and “homeurl”. Also added filter to support custom replacement variables in the URL. See readme.txt for documentation.
2.2.0: Support basic custom logout redirect URL for all users only. Future versions will have the same framework for logout redirects as for login redirects.
2.1.1: Minor code cleanup. Note: users now need “manage_links” permissions to edit redirect settings by default.
2.1.0: Added hooks to facilitate adding your own extensions to the plugin. See readme.txt for documentation.
2.0.0: Added option to allow a redirect_to POST or GET variable to take precedence over this plugin’s rules.
1.9.3: Made plugin translatable (Thanks Anja!)
1.9.2: Bug fix in code syntax.
1.9.1: Bug fix for putting the username in the redirect URL.
1.9.0: Added support for a separate redirect controller URL for compatibility with Gigya and similar plugins that bypass the regular WordPress login redirect mechanism. See the $rul_use_redirect_controller setting within this plugin.
1.8.1: Added proper encoding of username in the redirect URL if the username has spaces.
1.8.0: Added the ability to specify a username in the redirect URL for more dynamic URL generation.
1.7.3: Minor tweak on settings page for better compatibility with different WordPress URL setups.
1.7.2: Plugin now removes its database tables when it is uninstalled, instead of when it is deactivated. This prevents the redirect rules from being deleted when upgrading WordPress automatically.
1.7.1: Minor database compatibility tweak. (Thanks KCP!)
1.7.0: Added option $rul_local_only (in the plugin file itself) to bypass the WordPress default limitation of only redirecting to local URLs.
1.6.1: Minor database table tweak for better compatibility with different setups. (Thanks David!)
1.6.0: Added a function rul_register that acts the same as the wp_register function you see in templates, except that it will return the custom defined admin address.
1.5.1: Fixed compatibility for sites with a different table prefix setting in wp-config.php. (Thanks Eric!)
1.5: GUI for WordPress 2.6.2 and higher

Troubleshooting

  • If the MySQL user on your WordPress blog doesn’t have the necessary CREATE TABLE privileges to install the plugin, you can look in the plugin file for the CREATE TABLE SQL code and manually insert it into the database using something like phpMyAdmin (ask your web host about that if you’re not sure what that means.
Forum/Topic Started Last post Posts

Peter’s Login Redirect

****ERROR: Unknown error adding user-specific redirect for user ****

October 24, 2014
11:45 am by
chronicle
View

October 27, 2014
7:49 am by
Peter
View

4

Peter’s Login Redirect

Logout works great, but log in keeps going to my account page

May 19, 2014
6:19 pm by
GreenPeakLabs
View

August 26, 2014
4:47 pm by
Peter
View

5

Peter’s Login Redirect

Login Redirect Users Registered Before X Date

August 12, 2014
8:45 am by
fcvolunteer
View

August 15, 2014
12:34 pm by
fcvolunteer
View

6

Peter’s Login Redirect

****ERROR: Unknown database problem updating URL for “all other users” ****

July 30, 2014
6:34 pm by
Desktop Masters
View

August 3, 2014
11:44 am by
Peter
View

2

Peter’s Login Redirect

Removing Users

May 19, 2014
8:17 pm by
tsauer
View

August 3, 2014
11:12 am by
Peter
View

14

Zune review part 3: Sharing music with Zune Social

When I first heard that Microsoft was finally making its mp3 player available in Canada, I noted its file sharing capabilities as the Zune’s most intriguing differentiating factor. Now that I have had the chance to use the Zune for almost two months, I have concluded that what Microsoft calls “Zune Social” is quite a well-implemented feature, although there is certainly room for improvement.

Sharing songs via the Zune software

There are actually two main ways to share songs — one is by sending them through the Zune software to your friends with Zune accounts. This is not particularly useful, and is only marginally better than e-mailing your friends to tell them about a song.

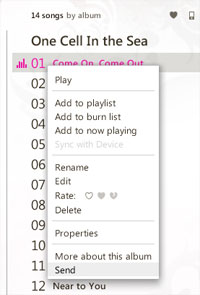
Sharing a song is quite easy, as you right-click the song you want and choose the appropriate menu item.

Sending a song via the Zune software

From there, you specify the e-mail address or Zune username of the recipient(s) and they will receive a notification about the shared song. In order to listen to the song, the recipient(s) must have the Zune software installed. Worst of all, they are presented with the same 30-second clip that they would get if they were just browsing through the Zune Marketplace. If the song you sent is not in the Zune Marketplace, then the recipient cannot even listen to it — they simply learn the song title and artist.

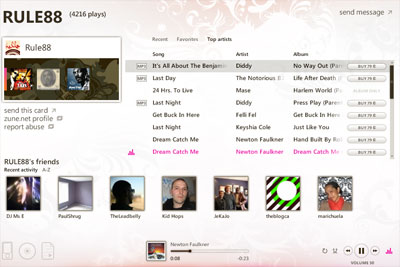
The Zune software partially redeems itself by having a nice interface to see what your Zune friends are listening to. On your friend’s Zune profile page, you can browse his or her recent plays, favourites, and top artists.

A Zune friend's profile

Note that you cannot browse their entire song library, but they can of course showcase songs for you by adding them to their list of favourites, e-mailing you about them or… beaming them to your Zune when you meet up!

Sharing songs from Zune to Zune

Beaming songs between Zunes is smooth and fun.

Two Zunes in the middle of a song transfer

The Zune-to-Zune sharing concept is great and is an innovative way to help people interact and discover new music. The recipient gets to listen to the full songs or albums 3 times before the shared music is automatically deleted. At that point, it is probably reasonable for someone to decide whether or not they want to purchase the shared songs or albums. You can also transfer pictures and podcasts without play (or view) limits.

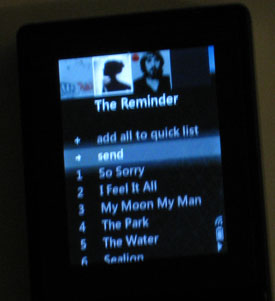
The sharing process is straightforward. First, the sender finds the song, album, picture, or podcast that they wish to share on the device. Then, he or she selects the Send menu item.

Selecting the song, album, picture, or podcast to share

As long as the recipient has the wireless setting enabled, the sender will then see them in the list of nearby Zunes.

A list of nearby Zunes

The recipient then gets an on-screen notice that someone wants to send them something.

Confirmation of whether you want to accept a song

Once approved, the transfer is quick, and I was able to beam an entire album to a friend in only a few minutes. During the transfer, both Zunes are locked from doing anything else such as playing a song. The received songs are then available like any other files (except that they self-destruct after 3 plays) and also available in a special inbox section under the Zune’s Social menu.

Now if you could convince all of your nearby friends to get a Zune, you could utilize the full potential of the Zune-to-Zune sharing feature. A friend and I spent one week each using our Zunes to scan for other random Zunes on Vancouver public transit during our respective morning and afternoon rush hour routes. Between the two of us, it was confirmed that as of Summer 2008, Vancouver is still iPod central (that or all Zune owners had the “discoverable” setting disabled); only one other Zune was found — the recipient didn’t look down to notice that they were being sent a song and thus no song transfer occurred :P

——————————————–

See also:

Zune review part 1: highlights and deal breakers
Zune review part 2: Zune Marketplace access from Canada


Zune giveaway

As hinted in part 1 of the review, I am now giving away the Zune I reviewed. It is just under two months old and is in excellent working condition with some of my fingerprints on it. It comes with the charger and an unused set of headphones.

To be eligible to win, you must 1) have a Canadian mailing address and 2) create a topic in this forum stating and elaborating upon something that you cannot stand about my Zune review. I will choose a winner after a yet to be determined period of time and notify him or her via e-mail.

October 4, 2008 update: the winner has been awarded and the contest is now closed!