Arrow

Posts on this site are never sponsored.

Best monthly cell phone plans for existing Fido and Rogers customers

If you’re an existing Fido or Rogers wireless customer on a monthly plan, this might sound familiar: you’re paying way too much ($50 – $60) for a plan that only gives you something like 100 anytime minutes, unlimited incoming calls, and 1000 evening and weekend minutes starting at 7pm. You don’t need a fancy data phone and you just want a reasonable talk and text plan.

Your contract is up for renewal, or you’re at least longing for the time when it will finally expire next year. You look at the new Fido and Rogers plans, and they’re underwhelming. You look at competitors like Koodo and Virgin Mobile; while they offer slightly better deals, it makes you uneasy to think about switching phones, transferring your contacts, porting your number, losing the flexibility of a GSM phone, and more.

All might not be lost. Fido or Rogers actually wants to keep you as a customer — they’re just a bit secretive about it. They have pretty good, unadvertised plans available for existing customers on monthly plans (not prepaid plans, although if you don’t use your phone much I’d suggest you look at a different provider), but you just need to know how to get them and also have a bit of luck on your side. This is what you need to do:

  1. Consider which features are important to you and how much you want to pay. Without explicitly disclosing this information to Fido or Rogers, you will use this to negotiate later.
  2. Read the RedFlagDeals.com forum threads for either Rogers retention plans or Fido retention plans. For the thread that applies to you, start with the first post on the first page to get some general instructions. Then start reading from the last page, and go backwards to get an idea of what deals people are currently getting.
  3. Call Fido or Rogers customer service. Remember to always be friendly and nice, but be persistent.
  4. Tell them you are thinking about cancelling your current plan. If they don’t immediately transfer you to a different department, ask for the cancellation or retentions department.
  5. Tell the person in the retentions department that you want to sign up for a new contract and that you’re a long-time customer. They might then negotiate some great deals with you, similar to what you read in one of those RedFlagDeals.com retention thread posts.
  6. If you don’t have luck on your first call, you might just have spoken to the wrong people, or gotten a customer rep who was having a bad day. Do some more research and try again.
  7. Return to the applicable forum thread from step 1 and report back on how things went, to help other people in similar positions!

———————————————-

As an example, this is what was negotiated from Fido in January 2009, on behalf of a friend who was an existing Fido customer, previously paying $55 a month for a plan with less features:

– $28 a month, including all taxes
– 2-year contract
– 200 anytime minutes
– no System Access Fee or 911 fee
– Caller ID with name display
– Call waiting
– Voicemail
– Unlimited Fido-to-Fido calls
– Unlimited evening and weekend calls starting at 5pm (the alternative was 7pm evenings and weekends or unlimited incoming calls)
– 2500 text messages
– $50 account credit (the alternative was a new phone for free)
– Unlimited local calling for the first 2 months

Here is a summary of how the call went. The first Fido customer service representative said that to get one of the new Fido plans (whose only redeeming factor is that there is no SAF or 911 fee), existing customers have to pay a $25 transfer fee. The alternative would be to renew the existing, grossly overpriced $55 plan. She said she couldn’t match the features on the Koodo or Virgin plans at a competitive price. When I complained, she said that she can either give me a $5 monthly credit off the new Fido plan as listed on the website, or that she could waive the SAF and 911 fees on the existing plan. Neither alternative was particularly appealing.

I said that maybe I’m not talking to the right department. I said that I’m strongly considering cancelling my plan if she cannot give me a reasonable deal. I said that I had friends who had gotten more reasonable deals (without being specific). Finally, she transferred me to a different person, who she referred to as being a customer representative.

This new customer representative was still hard to convince. He tried to tell me that the new plans were a good deal. He told me that the Fido managers won’t let them give favoured deals. I said that I’ve been a loyal customer, that I’m being given no choice but to switch providers, and that I’m open to contract if that gives me a better deal.

Suddenly the customer representative started telling me about a really good, unpublicized deal available only to existing customers, as long as I’m willing to sign a 2-year contract; he gave me a list of features slightly worse than what I listed above. However, the more we spoke, the better the deal got (like with evenings and weekends starting at 5pm; the first two months of unlimited local calls; a free phone or a credit on my account). I didn’t shoot for the moon, but I ended up with a significantly cheaper and better plan than I (my friend, actually) was paying for before.

How to paginate the display of MySQL data in PHP

Suppose that you have a long list of data rows stored in a MySQL database. This could be something like personal or business contacts, book entries, or blog posts. Without pagination, the display might be hard for a user to manage.

Here’s a PHP code outline to paginate the output of data to show something like this:

Pagination example

<?php

// How many entries you want to show per page
$perpage = 5;

// Find out what page of entries you are looking for
// The reason why you subtract 1 is so that you can calculate which returned entry (for later when we query the database) to start at
if (isset($_GET['page'])) {
    $page = max(intval($_GET['page'] - 1), 0);
    $page_original = intval($_GET['page']);
}
else {
    $page = 0;
    $page_original = 1;
}

$start_at = $page * $perpage;
$start_at_public = $start_at + 1;

mysql_connect('dbhost-typically-localhost', 'dbusername', 'dbpassword');
mysql_select_db('dbname') or die( 'Unable to select database');

// How many entries are there?
$query = 'SELECT COUNT(*) FROM `tablename`';
$result = mysql_query($query) or die('Error in query: ' . $query);
$total_entries = mysql_result($result, 0);

// You've asked for a page that is too high
if ($total_entries < $start_at_public) {
    die('Not enough entries to go that high.');
}

// Grab the specified number of entries, starting at the appropriate record
$query2 = "SELECT `title`, `content` FROM `tablename` ORDER BY `publishdate` DESC LIMIT $start_at, $perpage";
$result2 = mysql_query($query2);

// Print those entries!
while ($entries = mysql_fetch_object($result2)) {
    print '<div class="entry">' . "\n";
    print '<h2>' . $entries->title . '</h2>' . "\n";
    print '<p>' . $entries->content . '</p>' . "\n";
    print '</div>' . "\n";
}

mysql_close();

$end_value_this_page = min($start_at + $perpage, $total_entries);

if (($end_value_this_page == $total_entries) && ($start_at_public == $total_entries)) {
    print '<p>Entry ' . $end_value_this_page . ' of ' . $total_entries . '</p>' . "\n";
}

else {
    print '<p>Entries ' . ($start_at_public) . '-' . $end_value_this_page . ' of ' . $total_entries . '</p>' . "\n";
}

// How many pages of content are there?
$total_pages = ceil($total_entries / $perpage);

if ($total_pages != 1) {

    print '<hr />' . "\n";
    
    print '<div class="paginator">' . "\n";

    $next_link = '';
    $previous_link = '';
    $page_links = '';

    // Loop through each of the pages
    for ($page_count = 1; $page_count <= $total_pages; ++$page_count) {

        if ($page_original == $page_count) {
        
            // We're on this page, so no link needed
            $page_links .= $page_count;

            // Get the "previous" link if there is more than one page and if this isn't the first page
            if ($total_pages > 1 && $page_count != 1) {
                $previous_link = '<a href="?page=' . ($page_count - 1) . '"><</a> | ';
            }
            
            // If there are more pages than this,  prepare the "next" link
            if ($page_count != $total_pages) {
                $next_link = ' <a href="?page=' . ($page_count + 1) . '">></a>';
            }
        }
        
        else {
            $page_links .= '<a href="?page=' . $page_count . '">' . $page_count . '</a>';
        }
        
        if ($page_count != $total_pages) {
            // Print a separator for all pages but the last page
            $page_links .= ' | ';
        }
    }
    print $previous_link . $page_links . $next_link . '</div>';
}
?>

Show latest posts on a page other than the WordPress main page

On WordPress-powered sites, by default the home page shows the latest blog posts. However, on some WordPress sites you might want to show a different page on the main page (at yoursite.com), and show the latest posts on a separate page (like yoursite.com/news). I’ve been asked a few times how to do this, so here’s how.

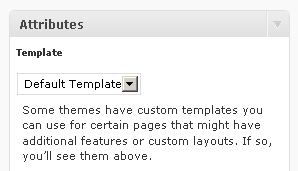
First, consider that behind every view on a WordPress site is a template. A simplified way of thinking about this is that the home page (which isn’t an actual “page” in the WordPress “post” / “page” system) loads the index.php template in your theme; a blog post loads the single.php template; and a static page loads the page.php template. With one of a few plugins, you can use different templates for specific posts; as for pages, WordPress has built-in support for page-specific templates:

On the sidebar of an add or edit page screen

Typically, the code in the index.php template contains The Loop for the number of posts configured in “Settings” > “Reading” > “Blog pages show at most”. This is what produces the home page of latest posts.

To transport the display of the latest / current posts outside of the home page, first create a specific page (called something like “News” or “Blog” or whatever’s appropriate for your needs) that will display the blog posts. This page can be empty.

Then, you can do one of two things. The more difficult way to do things is to transport the code for “The Loop” into a new page template, and set the “News” or “Blog” page that you created to use that template. Note, however, that “The Loop” is fed posts on the home page, but it is fed a single page on other pages. To feed it posts for use on a page, you must call query_posts directly before the loop. For example, to show the latest 5 posts:

  <?php query_posts('show_posts=5'); ?>
  <?php if (have_posts()) : while (have_posts()) : the_post(); ?>
  <?php // and so on with The Loop as normal... ?>

Then you would hard-code the index.php template to load whatever custom home page you want.

The simpler, built-in way to do things is to go to the “Settings” > “Reading” admin page:

The 'front page displays' option

Typically, the “front page displays” option is set to “Your latest posts”. However, you can configure it so that you have a custom page for the main / home / front page, and then assign the latest posts to another page. In the settings in the screenshot above, this means that the home page will load the template for the page named “Front” (this would be the page.php template unless a specific template was configured); while the “News” page will load the index.php template, which typically contains “The Loop” of latest posts.

Shaw and Telus Internet alternative in Metro Vancouver, BC

When searching for a home Internet (and phone) provider in British Columbia, it’s a bit discouraging to hear other people talk about the options. It’s mostly a two-headed Shaw Telus monster in Vancouver and the surrounding areas. Depending on who you ask, you hear stories with different combinations of bad or unreachable customer support, bad connection speed and reliability, and hidden fees.

If you’re in a supported building in Vancouver or Burnaby, you can try Novus, which has built its own fibre optic network. My building is not serviced by Novus…

I discovered Burnaby-based Lightspeed, aka Internet Lightspeed Communications, and their VoIP division, Dolphin Tel. Lightspeed / Dolphin Tel offers business or residential ADSL, high-speed Internet and phone services for both BC and Alberta. To see if they’re available in you’re area, search using your postal code here.

I’ve signed up for one of the “Freedom Plans” that combines an Internet and landline phone plan for $45 a month (that price includes a $5 system access fee). The up-front cost is a $140 modem, router, and phone adapter device. Of course, they have to use the building’s Telus wiring, but they do run their own network.

Lightspeed / Dolphin Tel does not have a 24/7 support line. Instead, it keeps a Monday through Saturday schedule of standard business hours. What’s nice is that when you call them during their business hours, an actual, qualified person answers the phone!

So far so good in that the Internet connection is speedy and the phone works. I’ll provide a review of Lightspeed / Dolphin Tel after I’ve used it for a bit longer. In the meantime, know that you have options! And if you’re a current or previous customer of Lightspeed / Dolphin Tel, I invite you to share your comments on them!

Update: I’ve now reviewed Lightspeed here. I’ve now reviewed Dolphin Tel here.

How to set up a print server: a general guide for home and small office networks

If you have already set up a network for multiple computers to share an Internet connection or to share files, one of your subsequent needs might be for all of those computers to be able to print on a single printer on the network. In my experience, sharing a printer in such an environment, also referred to as “setting up a print server”, is often poorly documented, and it might be hard to know where to start. Here’s a generic guide and some tips based on my fumbling (but eventually successful) attempts at sharing printers in home and small office networks over the past few years. It assumes that you know the basics about routers and IP addresses and that you have a setup whereby all computers are connected to one router.

The most basic printer setup involves a computer sending print jobs to a directly connected printer. Once this moves to a networked environment, you need a “print server” to receive the jobs from the different locations (the computers) via network protocols and relay them to the appropriate other location (the printer) on the network. A normal printer does not know how to do this. Therefore, you must use one of three methods:

  1. Leave one computer running at all times, with the printer hooked up to the computer. Here the computer that is directly attached to the printer is the print server.
  2. Use a router with a built-in print server. Here, the router is the print server.
  3. Use a printer with network capabilities. Here, the printer itself is the print server.

I have never set up option #1. In most cases, this is not particularly convenient because you have one computer on all the time. Then, you get convenience at the expense of efficiency. Therefore, I will discuss options #2 and #3.

Note: sharing the scanning feature in multi-function printers over a network is a whole other issue. I usually access the scanning feature from only one computer and then make the scanned file available at whatever file sharing location has been configured.

Equipment required

Option #2

  • a router with a built-in print server
  • any printer, unless the router does not support it for some reason

In this case, the printer is connected to the router via a USB cable or a parallel printer cable, depending on what’s supported on the router and the printer. It is the USB or parallel printer port that makes a router special here.

Consumer retail stores often carry only one or two routers that provide print server capabilities. I’ve found that wired routers are easier to find than wireless routers for that purpose. Also, wireless routers with print servers are considerably more expensive (2-4 times the cost of a basic router) and you must do your research to find a solid one.

(About three years ago, the most economic way for me to set up a wireless network with a print server using my existing printer was to have two routers: a wired router with a built-in print server attached to a wireless router.)

Option #3

  • any router
  • a printer that supports a wired (takes an Ethernet / Category 5 cable) or wireless network connection

Network-capable printers are easier to find than routers with built-in print servers. Network-capable printers sometimes have model numbers with an “N” at the end, like the Samsung CLP-300N versus the normal Samsung CLP-300. What makes a network-capable printer special is that the router treats it like any other location on the network. For example, if your printer supports only a wired connection, you would use the same type of cable as a computer to connect it to the router.

Option #3 is usually more reliable than option #2. Put simply, the print server aspect in option #3 is catered to the printer in question.

Adding the printer on the client computers

Options #2 and #3 follow the same principle: you add a printer on each client computer as if you were adding a normal printer, except that you use the TCP / IP port. Note that the demonstrations I will show use Windows XP as the example — the overall principle should be the same on all operating systems.

First, you will need to find the IP address of the printer. If you’re using a router with a built-in print server (option #2), the IP address of the printer is the IP address of the router. If you are using a network-capable printer (option #3), log in to your router (check your router’s manual for information on how to do that) and find the printer in the “DHCP” or “Client list” or similar page. If your router has a “static IP” feature, where you can assign fixed internal IP addresses to MAC addresses, be sure to use that so that the printer always has the same IP address.

Next, download the drivers for your printer from the manufacturer’s website, or have the installation disc ready. This should be done for each computer to which the printer was not already added. Some printer guides steer you towards downloading bloated management software (for me that was the Brother 685CW manual telling me to install an 80mb program instead of just the drivers) but that’s usually not necessary.

Then, add the printer as per usual. In Windows XP, the process is as follows:

  1. On the Start menu, click Settings > Control Panel > Printers and Faxes > Add a printer.
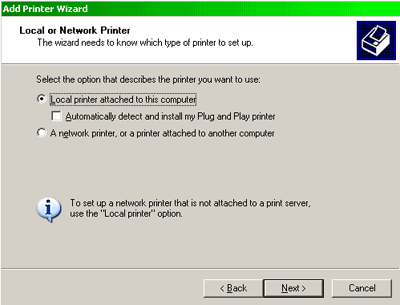
  2. Contrary to what one might think, select “Local printer attached to this computer” and uncheck the box “Automatically detect and install my Plug and Play printer”.

    Local printer attached to this computer

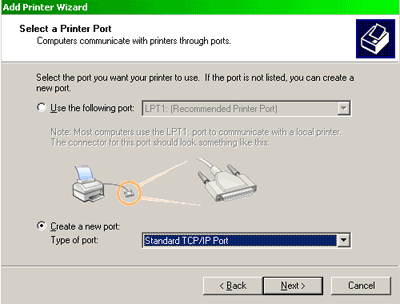
  3. You should then be asked to select a port. Choose to create a new port of the “Standard TCP / IP” variety.

    New Standard TCP / IP port

  4. In the TCP / IP wizard that opens, use the IP address that you noted earlier for the router (option #2) or printer (options #3). The “Port Name” can be anything you want.
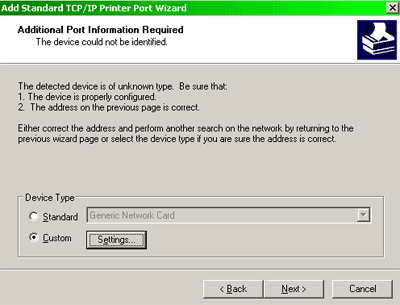
  5. The operating system might then automatically determine the appropriate settings for that port. Otherwise, you’ll have to fill in the settings yourself. This is perhaps the most important and variable step. Select the “Custom” device type, then click the “Settings…” button.

    Custom device type

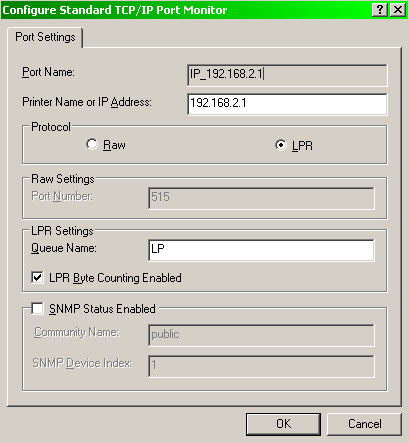
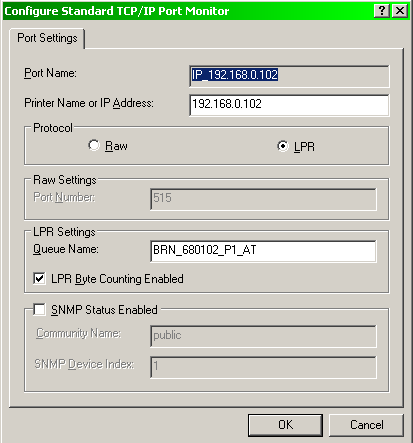
  6. If your router (option #2) or printer (option #3) has any documentation for the port settings, follow that carefully. Here are some settings for the various printers and configurations I’ve set up

    Samsung SCX-4100 connected via a parallel printer cable to my wired router with a built-in print server (option #2):

    Port settings for a wired router with a built-in print server

    Brother 7820N connected to the router via standard network cable (option #3) (note: the numbers “680102” were the last 6 digits of the printer’s IP address as per the documentation):

    Port settings for Brother 7820N

    Brother 685CW (option #3), which is a wireless, network-capable printer:

    Same as above but with “BINARY_P1″ in the “Queue Name” field. This is a default queue name that might work with many other network-capable printers.

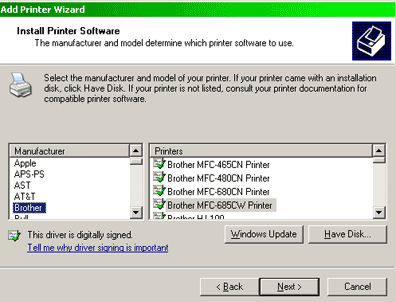
  7. Once the port is set up, add the printer as per usual. Make sure you have the necessary drivers handy if your printer does not appear on the list.

    Add printer as per usual

That’s it! You can then use your networked printer as you would any other printer. The most common errors I’ve seen when troubleshooting are that the queue name was not specified properly (check your router’s or printer’s documentation to see whether it’s picky about that) or that the router has strict firewall settings to limit network traffic between locations.