Arrow

Posts on this site are never sponsored.

mysqltuner: automatically optimize MySQL settings

If you run your own server, a virtual private server, or a cloud server with shell access, you might want to optimize your MySQL settings. This can greatly increase your site’s performance by making the best use out of memory and caching, and minimizing disk swapping. However, if you’ve read up on settings such as the InnoDB buffer pool size, query cache, table cache, and so on, you might not know where to start in terms of what to tweak. Among other things, mysqlreport can give you lots of data to analyze. My favourite, however, is mysqltuner, which is a Perl script that will run diagnostics on your MySQL database and make specific recommendations.

mysqltuner is easy to install and use. You can download the Perl file or use an installer, such as yum (yum install mysqltuner) on Red Hat and CentOS.

Then, you can run perl mysqltuner.tpl or mysqltuner, follow the prompts for the database credentials, and wait for the results:

-------- Performance Metrics -------------------------------------------------
[--] Up for: 145d 4h 29m 13s (17M q [1.388 qps], 290K conn, TX: 100B, RX: 27B)
[--] Reads / Writes: 97% / 3%
[--] Total buffers: 168.0M global + 2.8M per thread (151 max threads)
[OK] Maximum possible memory usage: 583.2M (14% of installed RAM)
[OK] Slow queries: 0% (199/17M)
[OK] Highest usage of available connections: 8% (13/151)
[OK] Key buffer size / total MyISAM indexes: 8.0M/3.5M
[OK] Key buffer hit rate: 100.0% (120M cached / 13K reads)
[!!] Query cache is disabled
[OK] Sorts requiring temporary tables: 0% (751 temp sorts / 2M sorts)
[!!] Joins performed without indexes: 922026
[!!] Temporary tables created on disk: 35% (1M on disk / 4M total)
[!!] Thread cache is disabled
[!!] Table cache hit rate: 0% (400 open / 238K opened)
[OK] Open file limit used: 5% (58/1K)
[OK] Table locks acquired immediately: 99% (33M immediate / 33M locks)
[!!] InnoDB data size / buffer pool: 3.0G/128.0M

-------- Recommendations -----------------------------------------------------
General recommendations:
    Run OPTIMIZE TABLE to defragment tables for better performance
    Enable the slow query log to troubleshoot bad queries
    Adjust your join queries to always utilize indexes
    When making adjustments, make tmp_table_size/max_heap_table_size equal
    Reduce your SELECT DISTINCT queries without LIMIT clauses
    Set thread_cache_size to 4 as a starting value
    Increase table_cache gradually to avoid file descriptor limits
Variables to adjust:
    query_cache_size (>= 8M)
    join_buffer_size (> 128.0K, or always use indexes with joins)
    tmp_table_size (> 16M)
    max_heap_table_size (> 16M)
    thread_cache_size (start at 4)
    table_cache (> 400)
    innodb_buffer_pool_size (>= 3G)

Then, modify the settings you are comfortable with (typically in /etc/my.cnf or directly in the MySQL console to make temporary changes) and restart MySQL if necessary. You can then run mysqltuner at any time again in the future to get up-to-date recommendations.

Homemade granola bars recipe

Granola bars are not something I typically think of as something to make at home, due to the plethora of granola bar variations available at grocery stores. But they are surprisingly easy to make, are arguably tastier, and do not contain soy lecithin, high fructose corn syrup, and other questionable ingredients. The recipe below is taken from allrecipes.com, with a few minor variations. I’ve found that it makes between 12 and 16 bars, and keeps well for at least a couple of weeks.

Homemade granola bars

Ingredients

2 1/2 cups crispy rice cereal
2 cups quick-cooking oats
1/2 cup craisins (or raisins)
1/2 cup packed brown sugar
1/2 cup honey
1/2 cup crunchy peanut butter
1 teaspoon vanilla extract

Directions

In a large bowl, stir together the rice cereal, oats, and craisins. Set aside. Grease a 9×13 inch baking dish.

Combine the brown sugar and honey in a small saucepan over medium heat. Heat just until boiling, then remove from heat and stir in peanut butter and vanilla until smooth. Pour over the cereal and oat mixture, and mix well.

Press into the prepared pan using the back of a large spoon, a spatula, or your hands. Allow to cool, then cut into rectangles, squares, or whatever shape you want.

P3P policy definitions: setting cookies in iframes in IE

If you’re developing a Facebook application in an iframe, and in that iframe you need to set cookies, your cookie functionality might not function correctly in Internet Explorer browsers. This is not just the case for Facebook apps, but for many, the issue presents itself for the first time in a Facebook context. A quick Google search reveals an answer of setting a P3P header; if your application is written in PHP, it would look something like this:

header('P3P:CP="IDC DSP COR ADM DEVi TAIi PSA PSD IVAi IVDi CONi HIS OUR IND CNT"');

But what does it mean? In short, it’s a compact privacy policy framework, letting users know what information you are gathering about them, and what you are going to do with that information. (As stated by Wikipedia, “Microsoft Internet Explorer is the only major browser to support P3P.”) Technically, you can paste that random piece of code into your application and move on; however if you’re wondering what exactly you’re stepping up to, you can see all of the 3-4 character definitions on this site. Also, below is an outline of what the example policy means.

Generally what kind of information is being accessed:

IDC = Identifiable Contact Information: access is given to identified online and physical contact information (e.g., users can access things such as a postal address)

Policy around disputes:

DSP = The privacy policy contains DISPUTES elements.
COR = Errors or wrongful actions arising in connection with the privacy policy will be remedied by the service.

The purposes of collecting the information:

ADM = Information may be used for the technical support of the Web site and its computer system. Users cannot opt-in or opt-out of this usage (same as tag ADMa).
DEVi = Information may be used to enhance, evaluate, or otherwise review the site, service, product, or market. Opt-in means prior consent must be provided by users.
TAIi = Information may be used to tailor or modify content or design of the site where the information is used only for a single visit to the site and not used for any kind of future customization. Opt-in means prior consent must be provided by users.
PSA = Information may be used to create or build a record of a particular individual or computer that is tied to a pseudonymous identifier, without tying identified data (such as name, address, phone number, or email address) to the record. This profile will be used to determine the habits, interests, or other characteristics of individuals for purpose of research, analysis and reporting, but it will not be used to attempt to identify specific individuals. Users cannot opt-in or opt-out of this usage (same as tag PSAa).
PSD = Information may be used to create or build a record of a particular individual or computer that is tied to a pseudonymous identifier, without tying identified data (such as name, address, phone number, or email address) to the record. This profile will be used to determine the habits, interests, or other characteristics of individuals to make a decision that directly affects that individual, but it will not be used to attempt to identify specific individuals. Users cannot opt-in or opt-out of this usage (same as tag PSDa).
IVAi = Information may be used to determine the habits, interests, or other characteristics of individuals and combine it with identified data for the purpose of research, analysis and reporting. Opt-in means prior consent must be provided by users.
IVDi = Information may be used to determine the habits, interests, or other characteristics of individuals and combine it with identified data to make a decision that directly affects that individual. Opt-in means prior consent must be provided by users.
CONi = Information may be used to contact the individual, through a communications channel other than voice telephone, for the promotion of a product or service. This includes notifying visitors about updates to the Web site. Opt-in means prior consent must be provided by users.
HIS = Information may be archived or stored for the purpose of preserving social history as governed by an existing law or policy. Users cannot opt-in or opt-out of this usage (same as tag HISa).

Recipient of the information

OUR = Ourselves and/or entities acting as our agents or entities for whom we are acting as an agent.

Retention policy

IND = Information is retained for an indeterminate period of time. The absence of a retention policy would be reflected under this option. Where the recipient is a public fora, this is the appropriate retention policy.

Policy categories

CNT = The words and expressions contained in the body of a communication — such as the text of email, bulletin board postings, or chat room communications.

XE Trade review: CAD-USD online currency exchange

XE Trade is an online currency exchange service by the currency rate information site xe.com. It can be used for business and personal reasons, to exchange money between your own accounts or to send money to people in foreign countries and foreign currencies. This review is from the standpoint of a Canadian buying US dollars for personal use.

Why use XE Trade

The premise is that XE Trade would offer better rates and be more convenient than a bricks and mortar money changer, such as Vancouver Bullion Currency Exchange or Benny Lee & Co.

Regarding rates, this is true most of the time. I’ve seen XE Trade offer rates that are between 0.7 and 2.0 cents off the mid-rate listed on xe.com, with a tendency for the higher range on the weekend. This should be always better than everyday bank exchange rates and most of the time better than the other currency exchange specialists. There are no transaction fees.

The requirement to use XE Trade is that you have CAD and USD accounts, so that you can send XE Trade Canadian dollars and have XE Trade deposit US dollars directly into the relevant account. Of course, if you want US cash you’ll still have to go to your bank to withdraw the money after it was deposited. (And in the spirit of being obvious, if you’re paying USD expenses electronically, you don’t require the extra step of going to your bank.) Also, it takes a few days between initiating the transaction with XE Trade and having the US dollars back in your account.

You also have to provide XE Trade a lot of personal information in the sign up process, as detailed below. You do not have to provide any information to face-to-face money changers.

Therefore, for small transactions, it is arguable as to whether it is more convenient to use XE Trade and if not, whether it is worth the small savings. Higher volume and dollar amount transactions for business can more easily see the benefits!

Generally, however, XE Trade works about as well as can be expected by an online, third party currency exchange service. Each person’s needs and preferences will determine whether XE Trade is worth using.

Signing up

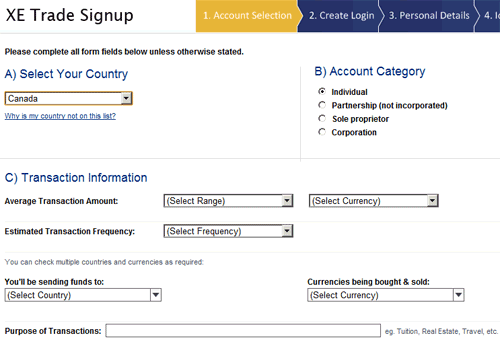
The signup process is straightforward and quick, although you have to provide a lot of information, comparable to the amount of information that is required when you are opening a new bank account. In addition to basic name, address, and other contact information, you have to state the reason for which you will be using the service.

XE Trade: signup step 1

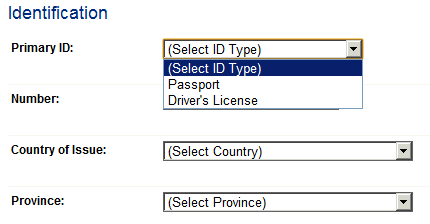
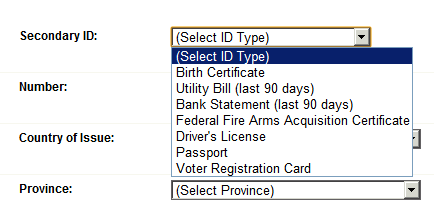
You also have to provide 2 pieces of identification, including at least one of a passport and a driver’s license:

XE Trade: signup step 2

XE Trade: signup step 3

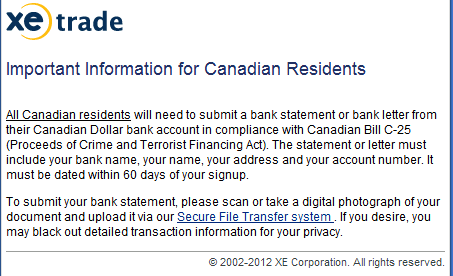
For Canadian residents, you also have to submit an electronic copy of a recent bank statement:

XE Trade: signup step 4

You then have to wait for your new account to be approved, although in my case this happened the same day.

Making a trade

At any time, you can get a current rate quote before making a trade. The rate is changes in real-time, although once you’ve started the process of making a trade, the rate is held for 40 seconds and locked in when you’ve placed the bid (before sending any money).

XE Trade: Quick quote

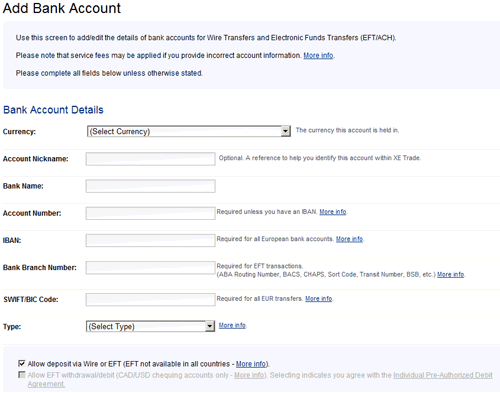
Before starting a trade you’ll want to set up your recipient bank account. This is quite simple, you just have to enter the bank information, account number, and transit number.

XE Trade: Adding a bank account

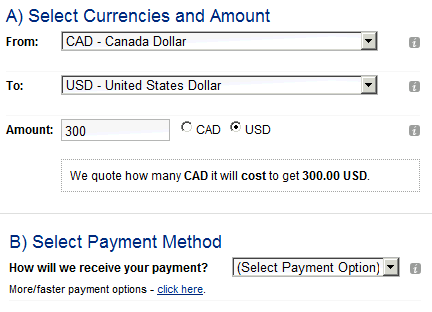
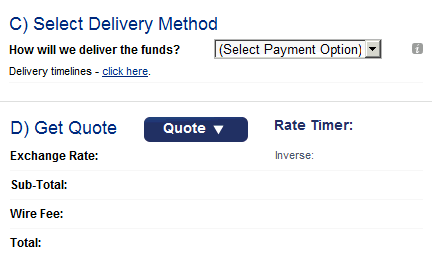
Then, you can set up the trade by entering the amount to trade, the source and destination currencies, your payment method, and the delivery method:

XE Trade: Initiate a trade step 1

XE Trade: Initiate a trade step 2

The delivery method can be a wire transfer or electronic funds transfer (EFT), both being free on the XE Trade end, and the latter being more likely to be free on the receiving bank end.

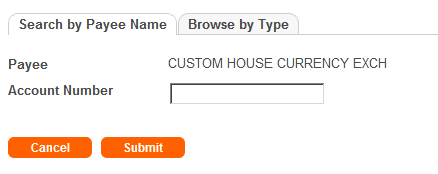
As for the payment method, you can choose “Wire” and then pay via your bank’s online bill payment service, selecting “Custom House Currency Exchange” as the payee and using your XE Trade account number.

XE Trade: Custom House Currency Exchange Payee

Timeline

The following is the timeline that it took for me to sign up with XE Trade and complete and entire exchange:

  • Day 1, morning: Registered for an account.
  • Day 1, mid-afternoon: Account was activated.
  • Day 2, morning: Submitted a trade and made a bill payment to send the money to XE Trade
  • Day 3, morning: Informed via e-mail that XE Trade had received my Canadian dollar payment and sent the US dollar equivalent.
  • Day 5, mid-day: US dollars showed up in my account, although dated Day 4, presumably due to some internal routing at the bank.

2015 update: Consider also CanadianForex, which I have now reviewed.

WestJet Airlines profit history

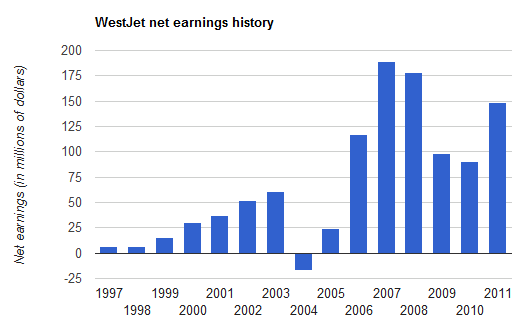
Amidst all of the reports of Air Canada‘s financial troubles and strikes, I was curious about the financial history of Canada’s other major airline, WestJet. I couldn’t find a simple chart on the history of WestJet’s profit / losses, either quarterly or yearly. Here’s a simple table and chart on WestJet’s annual net earnings history, taken from WestJet’s annual reports:

Year Net earnings (thousands of dollars)
1997 6,200
1998 6,500
1999 15,800
1999 15,800
2000 30,300
2001 36,700
2002 51,780
2003 60,539
2004 -17,168
2005 24,001
2006 116,631
2007 189,048
2008 178,506
2009 98,178
2010 90,197
2011 148,702

WestJet profit/loss history

Note: earnings prior to 2010 are stated using Canadian GAAP. 2010 and later are stated using IFRS, which is now mandatory for publicly accountable companies in Canada.

Note: I do not own, nor do I plan to ever own, shares in WestJet, Air Canada, or any related company.